Using WebMO Results in Python programs
Results from WebMO calculations can be acessed programmatically view the REST interface. Although this can be done from any programming language with http communication capabilities, Python is widely available, very popular, and particularly convenient for this purpose.
The REST-JSON interface documentation describes how to make REST requests to WebMO from Python. Several demonstration programs are provided within WebMO to illustrate this capability:
- Print results: display available job results in formatted JSON
- Coordinate scan: graph coordinate scan energies as a function of geometry change
- Geometry convergence: graph convergence of energy and rms geometry change from an optimization job
- Orbital diagram: graph orbital energy levels from a molecular orbital job
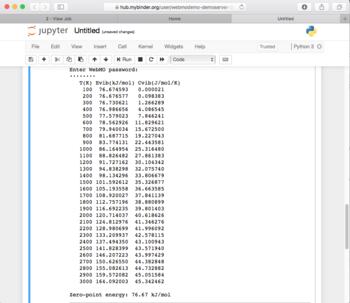
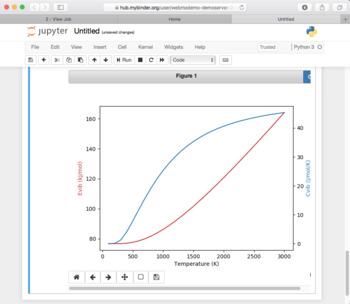
- Thermochemistry: use computed energy and frequencies to calculate and graph internal energy and Cvib as a function of temperature from a frequency job
These demonstration programs are available from the Jupyter link in the navigation panel on the View Results page. The WebMO administrator can add additonal Python programs by placing them in the <cgiBase>/REST/templates directory.
Jupyter is a web-based Python programming environment. The Jupyter server is often installed on a user's local computer, which has the advantage of being able to locally save Jupyter notebooks (programs and results). A Jupyter server can also be accessed on the web, which has the advantage of not having to install any software on a user's computer.
Jupyter Notebooks provide web-based Python programming
Jupyter (JUlia, PYThon,and R) is an interactive Python programming environment available within a web-browser. Jupyter can load and execute pre-written python programs or notebooks (a collection of comments, programs, ) or python programs.
Pre-requisites: The WebMO webserver must be capable of processing REST requests. Jupyter must be available to the WebMO user and running. Jupyter typically runs on the user's local computer so that notebooks can be saved, although installations on remote servers are also possible.
Several options exist for allowing WebMO users to access to WebMO output files via Jupyter:
Option 1: Jupyter is most commonly installed on a local machine
The easiest and recommended way to install Jupyter is by installing Anaconda, which includes Python, Jupyter, and Navigator to optionally install additional conda packages for numerical analysis:
- Download Anaconda for your local operating system. Use the latest Python 3.X version.
- Install the downloaded version of Anaconda.
- From a command prompt (Windows) or Terminal (Mac/Linux), navigate to a jupyter folder, and run Jupyter notebook on the local machine:
$ jupyter notebook - Use Jupyter to open and use a Python3 notebook
- When done, click the Quit button on the upper-left of the main Jupyter page to shutdown Jupyter. Or at the command prompt, type:
$ control-C, control-C
Option 2: MyBinder.Org can host an instance of Jupyter and reference a GitHub repository of notebooks
MyBinder.org provides an executable Jupyter notebook environment for a GitHub repository, thereby eliminating the need for each user to install Jupyter on their local machine:
- In a web browser, open
https://mybinder.org/v2/gh/<github_user>/<github_repository>/master
which will open a Jupyter notebook. This is most easily done by clicking the Jupyter link in the navigation bar, followed by Open Jupyter button. - Use Jupyter to open and use a Python3 notebook
- When done, click the Quit button on the upper-left of the main Jupyter page. Note that results will not be saved locally, as they were stored on the virtual Jupyter server which is being deleted!
Additional notebooks can be saved as .ipynb files in the GitHub repository, which must directly reference your WebMO server. Required python modules can be specified in a requirements.txt file in the repository.
Option 3: Jupyter can be hosted on the WebMO server (under development)
A development version of The Littlest Jupyterhub (TLJB) is available, though it is untested by WebMO. TLJB allows up to 100 users to access Jupyter notebooks running on the WebMO server itself.
Use System Manager to specify whether the Jupyter server is expected on a user's local machine or on a web-based host. The Open Jupyter button will open the location defined by Jupyer notebook URL.
Running WebMO Python Programs in a Jupyter Notebook
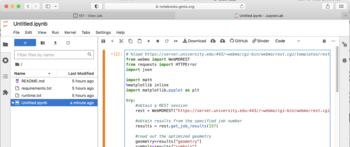
While viewing a job within the the WebMO interface, click the Jupyter link to open the Jupyter Notebook Templates dialog box
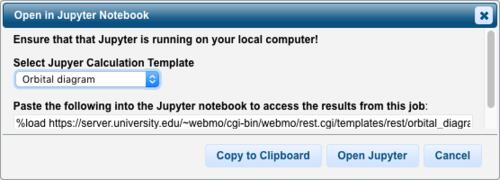
Jupyter Notebook Templates
To run a WebMO python program in your Jupyter notebook:
- Select a script from the dropdown list
- Click Copy to Clipboard to copy the %load template command
- Click Open Jupyter to open Jupyter in your web browser; it will either be a local or remote Jupyter server, depending on the Jupyter notebook URL specification in System Manager
- Choose New: Notebook-Python3 to open a notebook
- Paste in the %load template command into a code cell, and click Run to load the Python program
- Click Run again to execute the program
Python scripts added to the <cgiBase>/REST/templates directory will be dynamically displayed to in the dropdown list for users to select.
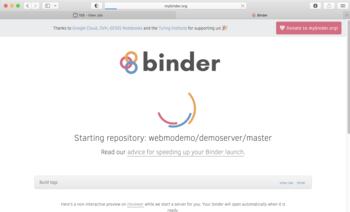 MyBinder Jupyter Server |
 Jupyter Notebook |
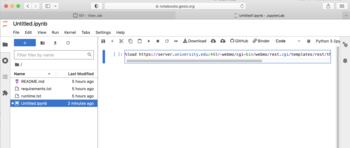 %load Template |
 Python Program |
 Python Output |
 Python Output, continued |
Tips on Using Jupyter Notebooks
What is Jupyter?
Jupyter notebooks are similar to Mathematica notebooks, Maple worksheets, or MathCAD documents, which allow for interactive analysis and documentation of scientific questions. Jupyter extends these prior examples from stand-alone applications to the web.
A Jupyter Notebook Document (*.ipynb), or simply "Jupyter notebook", contains both code and rich text elements (figures, links, equations, ...). Because of the mix of code and text elements, a Jupyter notebook can bring together data, description of analysis, real-time analysis and results. The Jupyter Notebook App allows you to edit and run notebooks via a web browser.
Jupyter notebooks are documents in JSON format that can be opened by the Jupyter notebook app.
The two main components of the Jupyter notebook app are the kernels and a dashboard:
- A kernel is a program that runs the user's code. The Jupyter Notebook App has a kernel for Python code, but there are also kernels available for other programming languages.
- The dashboard of the application displays existing notebook documents and can open them. It can also be used to manage the kernels, ie, view which ones are running and shut them down if necessary.
Starting Jupyter
After installing Jupyter (see above), Jupyter must be started from a terminal session:
$ jupyter notebook
A webpage containing the Jupyter app will open up with tabs for Files, Running, and Cluster. Note that the URL will be something like:
http://localhost:8888/tree
"localhost" is not a website, but your own computer. "tree" is your home or root directory.
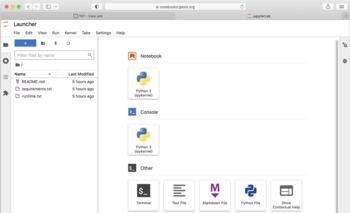
Jupyter Home Page
Running an existing notebook
On the File tab, navigate to folder with your *.ipynb ("iPython notebook") files and run the desired file. A kernel will be started to run notebook, and the existing notebook will appear in a new webbrowser tab.
The notebook can be edited, etc. Changes are automatically saved.
To exit the document, File: Close and Halt will shutdown the kernel and exit the page.
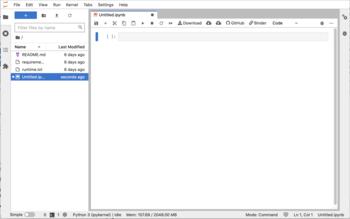
Creating a new notebook
On the File Tab, click the New dropdown and select Python3. A kernel will be started to run notebook, and the blank notebook will appear in a new webbrowser tab.
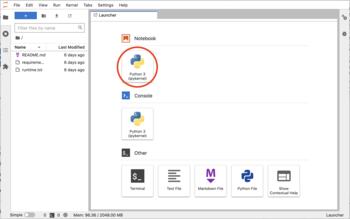 Choose New Notebook |
 Empty Python 3 Notebook |
Interacting with a Jupyter Notebook
A notebook consists of cells, which may be of the following types:
- Code: contains python code and resulting output
- Markdown: contains formatted text for explanatory purposes
- Raw NBConvert: rare; content that should be included unmodified in nbconvert output
- Headings: deprecated; replaced with Markdown
A Code cell contains python code to be executed by the kernel. It displays the output at the bottom of the cell. It has a label "In[ ]" on the left. The contents of "[ ]" is blank if not yet run, * if running, or a number representing the order of processing by the kernel.
A Markdown cell contains text formatted in markdown language and is editable in edit mode. It displays its formatted output when run from command mode. It does not have a label on the left.
There are two modes of interacting with cells:
- Edit (green border): contents of cells are editable
- Command (blue border): commands are executed upon cell, eg, run or display
One can toggle between edit and command mode with Esc and Enter, respectively.
IMPORTANT: You must run the contents of a cell to see the code output or formatted display!
Example
Open a new Python3 notebook. In the green code cell, type
print ('Hello World!')
and click the run button (or select Cell: Run Cells, or press Ctrl+Enter). The program output will apear below the code cell.
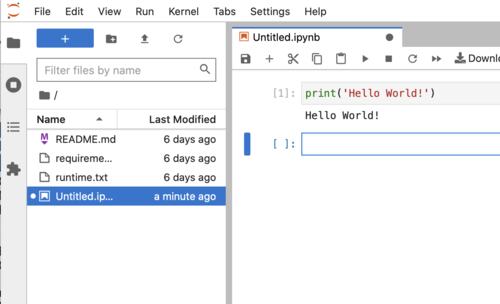
Jupyter Python Program
Magic commands
There are also "magic" commands that execute outside of Python:
- %load: inserts code from an external script
- %quickref: display a list of useful commands
Exiting Jupyter notebook
Click the Quit button on the upper right of the Jupyter Ntebook App webpage. Alternatively, type Ctrl+C twice in the terminal session from which Jupyter was started.